Follow Me On Social Media!
No Bake Santa Oreos: Irresistibly Festive Holiday Cookies!
Introduction to No Bake Santa Oreos Holiday Cookies
The holiday season is all about sweet treats, and what could be better than indulging in No Bake Santa Oreos Holiday Cookies? Imagine a festive gathering where these delightful cookies steal the spotlight, captivating everyone with their charming appearance and delicious flavor. With just a few simple ingredients and no baking involved, these cookies are as quick to make as they are fun to eat. Whether you’re planning a holiday party or looking for a special treat to enjoy while cozying up on the couch, these cookies are sure to bring smiles and festive cheer.
What makes No Bake Santa Oreos so special?
These delightful cookies stand out for several reasons, making them a must-try this holiday season:
-
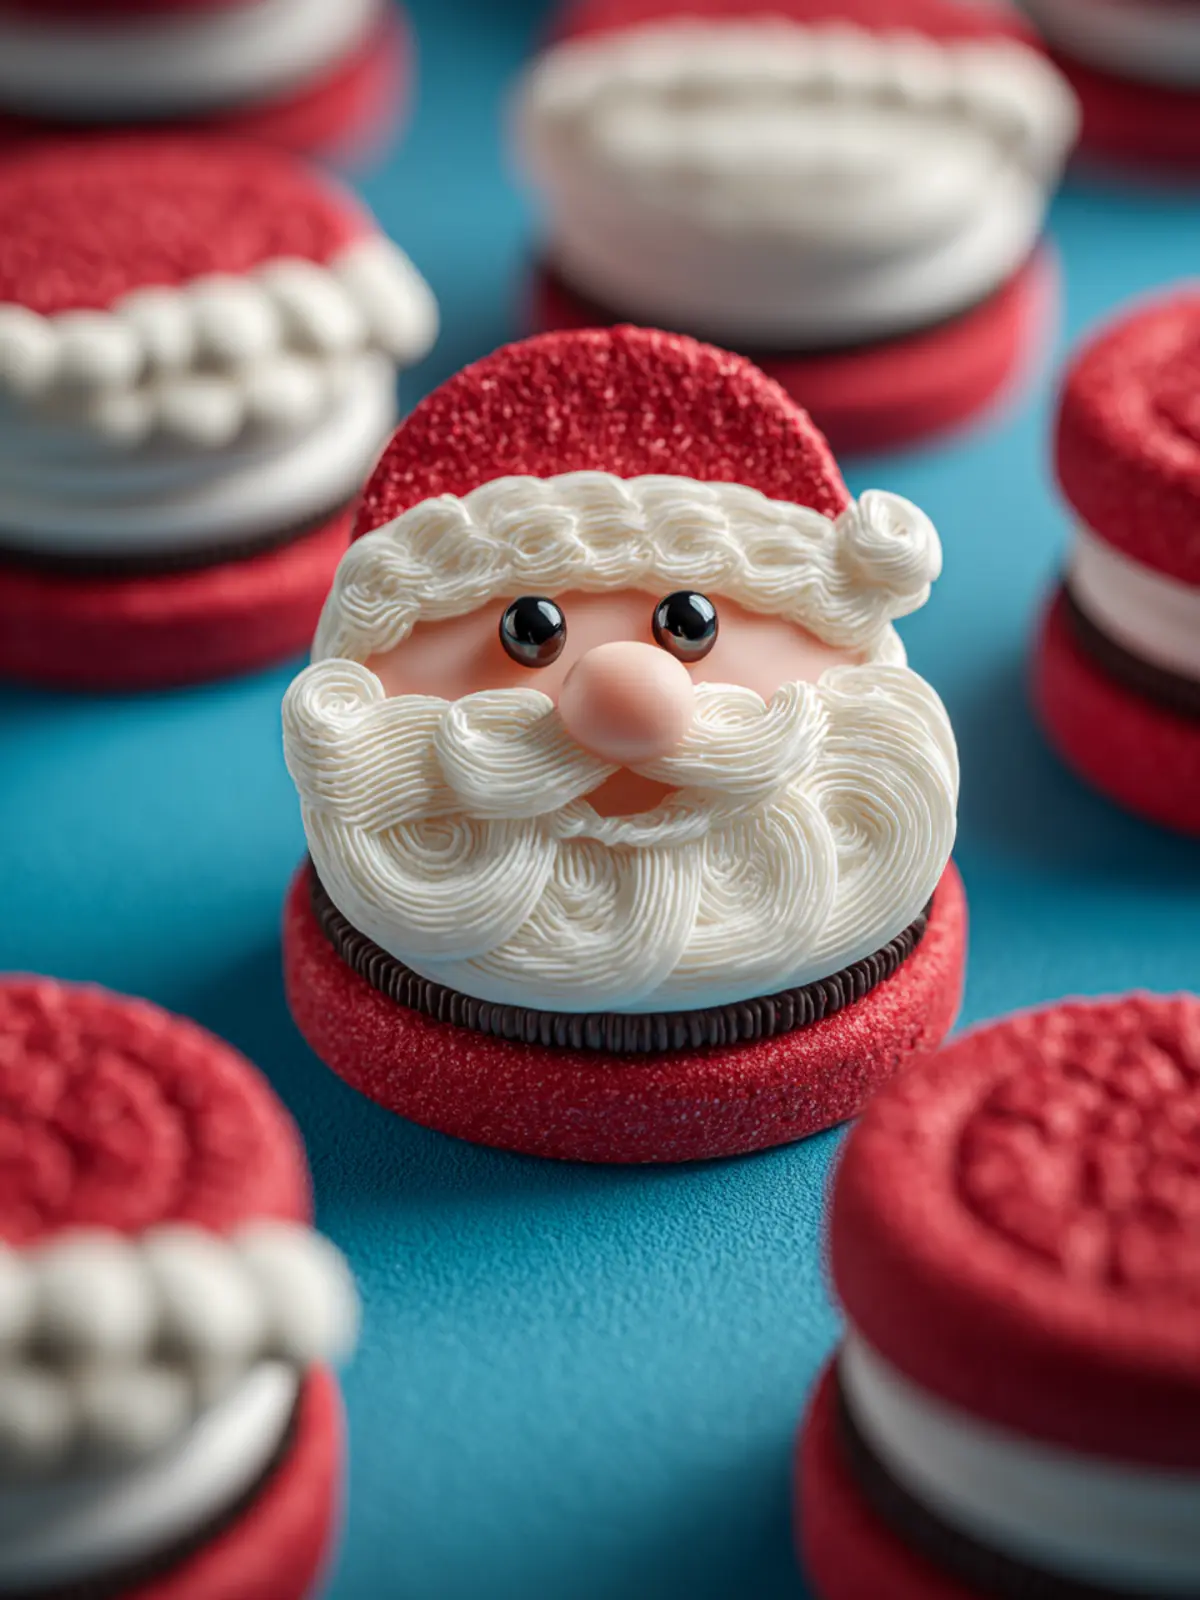
Visual Appeal: Dressed up to resemble jolly Santa faces, these cookies are not just a treat for the taste buds but also for the eyes. The fun designs can bring some creativity to your holiday platter.
-
Simplicity in Preparation: Unlike traditional baked cookies that require time and precision, No Bake Santa Oreos come together in mere minutes. All you need is a handful of simple ingredients and a little creativity to pipe out the frosting decorations.
-
Customizable: Not only can you make these cookies as Santa or use other festive designs, but you can also get creative with flavors and colors. Have leftover colored sprinkles? Toss them in! Want to swap white chocolate for dark? Go for it!
-
Perfect for All Skill Levels: Whether you’re a seasoned baker or just starting, this recipe is perfect for everyone. Kids can join in the fun, making these cookies a wonderful family activity that creates lasting memories.
-
Great for Gifting: Packed in a pretty tin, these cookies make perfect holiday gifts for friends and co-workers alike. Who wouldn’t love receiving a delightful treat that evokes the spirit of the season?
In essence, No Bake Santa Oreos Holiday Cookies offer a blend of charm, simplicity, and creativity, making them an irresistible addition to your holiday festivities. Grab your ingredients, gather your loved ones, and let the cookie-making magic begin!

Key Ingredients for No Bake Santa Oreos Holiday Cookies
Creating delightful no bake Santa Oreos is a holiday ritual in many homes. It’s one of those recipes that not only tantalizes the taste buds but also brings a sprinkle of joy to any festivity. Let’s dive into the essential ingredients that make these cookies a seasonal favorite.
-
Oreos: The backbone of this recipe, Oreos give a rich, creamy, and chocolaty flavor that pairs perfectly with the other elements. I prefer classic Oreos, but if you’re feeling adventurous, the seasonal flavors work just as well!
-
Cream Cheese: This ingredient is crucial for achieving that luscious, creamy texture in the filling. Make sure it’s softened to room temperature for easy mixing. The creaminess balances the sweetness of the Oreos, making every bite heavenly.
-
White Chocolate: Melting white chocolate creates the perfect coating that hardens beautifully, giving your cookies that festive look and mouth-watering sweetness. A quality brand will make a noticeable difference.
-
Red and Green Sprinkles: For that holiday flair, let’s not forget the sprinkles! They add a pop of color and whimsy, making your no bake Santa Oreos not just a treat for the taste buds but also a visual delight.
By using these key ingredients, you’ll whip up a batch of no bake Santa Oreos that is sure to impress your family and friends, making your holiday celebrations even more memorable.
Why You’ll Love No Bake Santa Oreos
When the holiday season approaches, there’s an undeniable charm in preparing festive treats like no bake Santa Oreos. These delightful cookies combine the joy of seasonal festivities with the satisfaction of a simple, no-fuss recipe. Imagine the delight on your friends’ and family’s faces as they unwrap these sweet surprises—each bite is a delicious blend of flavors that perfectly encapsulates the spirit of the holidays.
Quick and Easy Preparation
One of the best things about no bake Santa Oreos is the speed with which you can whip them up. A hectic holiday schedule doesn’t stand a chance against this no-bake wonder. With just a handful of ingredients and minimal prep time, you can create a festive treat that looks and tastes spectacular.
Perfect for Gatherings
Picture this: a cozy gathering, laughter filling the air, and a vibrant platter of no bake Santa Oreos at the center of the table. These cookies serve as fun conversational pieces and delightful treats to enjoy. Plus, they’re the perfect make-ahead dessert option, allowing you to spend more time mingling and less time in the kitchen.
Creative Customization
Another reason to love these cookies is the opportunity for creativity. Whether you want to play with the decorations or try out different flavor combinations, the possibilities are endless. With simple ingredient swaps or added toppings, you can make your dessert uniquely yours, ensuring each batch reflects your personal touch.
Embrace the holiday spirit with no bake Santa Oreos, the perfect blend of simplicity, flavor, and festive cheer!

Cooking Tips and Notes for No Bake Santa Oreos
Creating no bake Santa Oreos is a delightful way to spread holiday cheer without turning on the oven. While the simplicity of this recipe is part of its charm, a few tips can help you elevate your festive treat and ensure they turn out perfectly.
Choose the Right Oreos
For your no bake Santa Oreos, consider using classic Oreos for the traditional flavor. If you prefer a twist, feel free to experiment with different Oreo flavors. This creates a fun and festive variety that will excite your guests.
Perfect the Cream Cheese Mixture
The cream cheese is essential for the filling, giving it that luscious texture. Make sure it’s softened before mixing; this will help you blend it smoothly with the powdered sugar and vanilla extract. If the mixture feels too thick, a splash of milk can help achieve that perfect, spreadable consistency.
Chill Time is Key
After assembling your no bake Santa Oreos, allow them to set in the fridge for about 30 minutes. This helps the filling firm up and makes dipping them in chocolate easier. Remember, patience is a virtue in the kitchen!
Decorating for the Holidays
Get creative with your decorations! Use a variety of sprinkles, edible glitter, or even crushed candy canes to give your no bake Santa Oreos that extra sparkle and festive flair. Personal touches make your treats even more special and fun to share.
By keeping these tips in mind, your no bake Santa Oreos will not only look fab but also taste delicious, making them an irresistible treat for the holiday season. Happy baking!
Serving Suggestions for No Bake Santa Oreos
Bringing no bake Santa Oreos to your holiday gathering is sure to delight your guests! These festive treats not only look charming, but they’re also incredibly versatile when it comes to serving options. Here are some delicious serving ideas to elevate your holiday cookie experience:
-
Festive Platter: Arrange your Santa Oreos on a decorative platter, adding some fresh berries and mint leaves for a pop of color. It enhances the overall presentation and gives a fresh contrast to the rich cookies.
-
Serving with Milk: These cookies pair beautifully with a glass of cold milk or your favorite dairy-free alternative. For an extra touch of elegance, try serving a flavored milk, like chocolate or vanilla.
-
Gift Boxes: Consider packaging your no bake Santa Oreos in festive gift boxes. They make perfect homemade holiday gifts for friends and coworkers, wrapped with colorful ribbons and a cute label.
-
Cookie Bar: If you’re hosting a holiday party, set up a cookie bar where guests can mix and match their preferences. Include toppings like crushed candy canes or mini marshmallows to create their unique flavor combinations.
Each of these serving suggestions enhances the joy of sharing no bake Santa Oreos, filling your home with warmth and holiday spirit!

Time Breakdown for No Bake Santa Oreos
Creating No Bake Santa Oreos is a delightful holiday experience that requires just the right amount of time and patience. Here’s a handy breakdown to help you plan your festive cookie-making session.
Preparation Time
Setting aside about 20 minutes is all you’ll need to gather your ingredients and whip up these charming treats. This includes melting your chocolate, assembling, and decorating your cookies.
Freezing Time
After you’ve shaped and decorated your No Bake Santa Oreos, a solid 30 minutes in the freezer will help them set perfectly. This step is crucial for achieving that satisfying crunch when you take a bite.
Total Time
Overall, you’re looking at about an hour to create these whimsical cookies from start to finish. Perfect for a quick holiday treat for gatherings or to enjoy with family!
Nutritional Facts for No Bake Santa Oreos
When diving into the No Bake Santa Oreos, you’re not only crafting a delightful treat but also indulging in some interesting nutritional facts. It’s always beneficial to know what you’re enjoying during the festive season.
Calories
Each No Bake Santa Oreo packs around 110 calories. This makes them a tempting yet manageable dessert option for your holiday gatherings.
Sugar
These cookies contain approximately 10 grams of sugar per piece. While they satisfy your sweet tooth, be mindful of enjoying them in moderation.
Fat
With about 6 grams of fat per cookie, these treats offer a rich and creamy texture, thanks to that yummy cream cheese and buttery goodness. They’re decadent, perfect for sharing, but ideal for occasional indulgence.
So, as you whip up these delightful cookies, remember to enjoy the magic of the holidays while keeping an eye on those nutritional stats!
FAQ about No Bake Santa Oreos
Creating no bake Santa Oreos can be a delightful experience during the holiday season, but you might have some questions as you embark on your festive baking journey. Here are common queries to help you along the way.
Can I use different types of Oreos?
Absolutely! While classic Oreos are a fan favorite for this recipe, you can switch things up depending on your taste preferences. Imagine using mint Oreos for a refreshing twist or red velvet Oreos for a rich and festive connotation. Just keep in mind that using flavored Oreos might alter the frosting flavors slightly, but that could lead to a delightful surprise in your holiday cookie assortment!
How long can I store these cookies?
Your no bake Santa Oreos will stay fresh in an airtight container for about 5-7 days at room temperature. If you need to keep them longer, they can be stored in the fridge for up to two weeks. Just make sure to layer them between sheets of parchment paper to prevent sticking! Be cautious, though; the longer they sit, the more the filling might soften, but they’ll still taste amazing!
Are there any substitutes for candy melts?
If you’re out of candy melts, don’t worry—there are alternatives! You can use white chocolate chips, melting them the same way you’d melt candy melts. If you’re looking for a healthier option, consider using Greek yogurt or cream cheese frosting to coat the cookies. Both options will give a delightful creaminess, though they may not set as firmly as candy melts.
Feel free to get creative and enjoy the festive process of making these delicious treats!
Conclusion on No Bake Santa Oreos Holiday Cookies
Bringing the magic of the season to your kitchen can be as simple as crafting these delightful No Bake Santa Oreos Holiday Cookies. The combination of sweet, creamy fillings and the satisfying crunch of Oreo cookies creates a festive treat that everyone will love. These cookies not only offer a unique twist on traditional holiday desserts, but they also serve as a fun activity to share with friends or family. As you savor each bite, you’ll find that the rich flavors evoke cherished memories of holidays past. Embrace the joy of the season with these easy-to-make cookies that truly capture the spirit of Christmas!
Print
Candy Melt Cookies
- Total Time: 18 minutes
- Yield: 12 servings 1x
- Diet: Vegetarian
Description
Delicious cookies decorated with candy melts and marshmallows, perfect for any occasion!
Ingredients
Scale
- 12 apple pie or golden oreos
- 6 oz red candy melts
- 6 oz white Ghirardelli’s melting wafers
- 12 marshmallows
- 24 candy eyes
Instructions
- Heat candy melts as directed. Each brand varies. Generally, heat them at 2 minutes on defrost and then another minute and a half on defrost. Stir well and if more time is needed work in one-minute intervals.
- Dip the cookie tops into the red and place on parchment paper. Add the marshmallow. Flash freeze for 3 minutes. Remove from the freezer and dip the bottom of the cookie into white. Pull out and set on parchment paper.
- Place the eyes by using some of the white melts as a glue. Use food tweezers for this. Let dry and serve.
Notes
- Make sure to use food tweezers for placing candy eyes for better precision.
- Ensure cookies are placed on parchment paper for easy removal after dipping.
- Prep Time: 10 minutes
- Cook Time: 8 minutes
- Category: Dessert
- Method: Baking
- Cuisine: American
Nutrition
- Serving Size: 1 cookie
- Calories: 150
- Sugar: 12g
- Sodium: 45mg
- Fat: 7g
- Saturated Fat: 3.5g
- Unsaturated Fat: 3g
- Trans Fat: 0g
- Carbohydrates: 20g
- Fiber: 1g
- Protein: 1g
- Cholesterol: 0mg